Cast in stone
I frequently like to find new and interesting ways to make my house renovation as difficult as possible for myself. The latest bright idea involved casting my own concrete worktops for our new kitchen. So, after weeks (probably months) of internet research, YouTube videos and conversations with anyone who would talk to me about it, I thought I would give it a whirl. I mean, how difficult could it be?
The Aim
Stylish 30mm polished and sealed concrete worktops.
The recipe
After reading a lot of conflicting reviews about the ingredients and mixing ratios, I opted for a mix that comprised equal parts – 25kg each - of cement, sharp sand and building sand plus 12kg of 10mm limestone aggregate and 6mm steel reinforcement mesh. The total cost of ingredients was only around £15 to make a section of worktop approximately 650mm x 2m.
The equipment
Essential equipment included a strong, level work surface plus softwood battens for formwork, cement mixer and shovel. I also needed some bolt croppers to section the reinforcement mesh plus tools to make the formwork, smooth and compact the concrete in the mould and a release agent to prevent the concrete from attaching to the formwork.
Measure twice…
The polishing process takes at least 3-4mm off each surface so your formwork needs to result in a slab 6-8mm larger than you need. Don’t be tempted to cast them too big, though, or you’ll be grinding the surface for days.

Reinforcement
The steel mesh actually consisted of two layers of 6mm bars that formed the core of the 30mm finished block and allowed plenty of clearance for the finished depth, even when polished. Centre the reinforcement by filling the formwork halfway with the concrete mix before laying the mesh and topping off with the other half of the mix. If you’re allowing for a sink or hob cut-out, don’t incorporate mesh into that area and if you’re planning a thinner surface, use smaller mesh.
Mixing
I was worried about over-wetting the mix, but, on the other hand, if it’s too dry, tamping the concrete down to eliminate air bubbles becomes a really labour-intensive process. The downside of a wetter mix is that the water rises to the surface during the first couple of hours in the mould and that needs scraping off to avoid a weaker ‘latence’ layer on the concrete.

'Tamping'
It’s important to encourage any air pockets out of the mix by thoroughly tamping the concrete. I used a spare piece of my 35mm formwork timber which was 35x35mm, ‘bouncing’ it repeatedly across the surface, front to back and side to side, to force the air upwards. You should see small bubbles emerging through the concrete and popping. Don’t scrimp on this stage; it is hard work but every air pocket you get rid of will improve the quality of the finished surface.
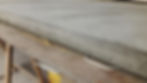
Trowelling
As the counter top is actually the one at the bottom of your formwork and hidden from view until dry, it’s worth hedging your bets by creating as smooth a surface as possible on the other side, too. So I carefully trowelled the surface before leaving it to go off. In the end, it actually made a good base for polishing and didn’t have the inevitable small air pockets that the other face at the bottom of the mould consistently displayed.
Polishing and installation
OK, so I bottled out of finishing the concrete as I didn’t fancy the mess involved in the grinding and polishing process in and around the house. Instead I asked my friendly local stone specialists at ‘A House of Stone’ in Lancaster and they polished and installed the worktops to splendid effect.

More information: www.ahouseofstone.co.uk